Compose Champion Indonesia 2023: Compose Migration Champion Challenge – Dicoding_JetpackPro_03
Figure 1 Compose Champion Indonesia 2023 – Challenge banner
About the Challenge
For the last 2 years, the Android team from Google has developed a new UI Toolkit that revolutionizes the current paradigm
for developing interfaces with a declarative, composable approach, namely Jetpack Compose.
Jetpack Compose is a modern toolkit for creating Android User Interface (UI) with better and latest mechanics. This framework
simplifies and accelerates UI development on Android with less code, powerful tools support, and of course built with an intuitive Kotlin API.
After successfully holding Compose Champion Indonesia 2022: Compose Migration Champion Challenge, this year Google and Dicoding
Indonesia are collaborating again to hold Compose Champion Indonesia 2023, a challenge with prizes with the aim of producing superior
Android Developers in the future. This challenge is called Compose Migration Champion and the target for this challenge is all Android
Developers who already have applications to migrate their UI to Jetpack Compose.
App Information
Figure 2 Android Logo
Type                        : Portofolio

Information                 : Project results for Compose Champion Indonesia 2023: Compose Migration Champion Challenge

Platform                    : Android - [Android](https://www.android.com/)

Programming Language        : [Kotlin](https://kotlinlang.org/)

Current version             : V2.0.0

Before migration result     : [Repository link](https://github.com/patriciafiona/Dicoding_JetpackPro_03/tree/c31c93aba8cab89d488f16fb126223108b166410)

Dicoding Class              : [Belajar Android Jetpack Pro](https://www.dicoding.com/academies/129)

Challenge reference         : [Dicoding Challenge] (https://www.dicoding.com/challenges/785)
This is not a double-entry bookkeeping, automatic this-and-that, ministry-of-finance-comliant-include-all-your-bank-accounts
type of software. It’s a simple, bare bones tool that will help you create a handful of invoices each month, track outstanding
payments, record expenses (including recurring ones based on templates), and check out all of the above with some simple reports.
Or you just don’t want your sensitive business data stored “in the cloud” (AKA someone else’s computer). But you could, if
you really wanted to.
Building
Run mvn clean verify in the accounting-parent sub-module. When finished, check the accounting-product/target/products
directory for a compressed executable program suitable to your operating system. To build the product for all supported
platforms, run Maven with the -P=release profile.
NOTE
The project is currently undergoing major upgrade work from an Eclipse 3-based to an e4 RCP application. Until finished, please use the stable/v1 branch for a fully functional application!
Also ongoing is a migration from db4o to Apache Derby/JPA/Eclipselink as the persistence provider as well as a switch from
a highly customized Jasperreports-based solution to BIRT for generating documents and reports.
Working with the sources
The sources include Eclipse project meta data. Since it is an Eclipse RCP-based product, and all. When importing the
projects into a workspace, note that at this time, a number of available modules will not compile:
the old core bundle (and tests): deprecated, only for reference during migration
ELSTER: migration outstanding
reporting: the old reporting bundle (accounting-reporting) is deprecated and will be replaced
These bundles (modules) are already excluded from the maven build (accounting-parent) and can safely be omitted from
the Eclipse workspace unless explicitly required. Some external dependencies (custom db4o and gson bundles) have already
been deleted.
Multi-Platform TOTP Management App
This open-source project aims to provide a secure and user-friendly Time-Based One-Time Password (TOTP) management application, similar to popular solutions like Authy, Google Authenticator, Microsoft Authenticator, or Aegis. Built using Dart and Flutter, this app ensures seamless functionality across various platforms, including iOS, Android, and web.
Features:
TOTP Generation: Generate time-based one-time passwords compatible with services supporting TOTP authentication.
Secure Storage: Safely store TOTP secrets locally on the device, ensuring the highest level of security.
Multi-Platform Compatibility: Enjoy consistent user experience across iOS, Android, and web platforms.
QR Code Integration: Easily import TOTP secrets by scanning QR codes from supported services.
Customization Options: Customize app settings, themes, and organizational features to suit individual preferences.
Backup and Sync: Implement backup and synchronization functionality to securely manage TOTP secrets across multiple devices.
Biometric Authentication: Enhance security with biometric authentication options such as fingerprint or facial recognition.
Contributing:
Contributions to this project are welcomed and encouraged! Whether you’re a seasoned developer or just getting started, there are various ways to contribute:
Bug Reports:
Report any bugs, issues, or suggestions for improvement via GitHub issues.
Feature Requests: Share your ideas for new features or enhancements that could benefit the community.
Code Contributions: Fork the repository, make your changes, and submit a pull request for review and integration.
Documentation: Help improve project documentation to make it more accessible and understandable for users and contributors alike.
Getting Started:
To get started with this project, follow these steps:
Contribution
Clone the Repository: Clone this repository to your local machine using git clone.
Install Dependencies: Ensure you have Flutter and Dart installed, then run flutter pub get to install project dependencies.
FIXME – Add the correct contribution guide
Run the App: Use flutter run to launch the application on your preferred platform (iOS, Android, or web).
Start Contributing: Explore the codebase, pick an issue, and start contributing to make this project even better!
License:
This project is licensed under the MIT License, which means you are free to use, modify, and distribute the code for both commercial and non-commercial purposes. However, contributions to this project are subject to the terms outlined in the CONTRIBUTING.md file.
Contact:
If you have any questions, or suggestions, or just want to say hello, feel free to reach out to us via email or create an issue on GitHub.
Let’s collaborate to build a secure and user-friendly TOTP management solution for everyone!
Find the color range of the target object and save it
Apply the correct morphological operation to reduce noise in the video
Detect and track the colored object with contour detection.
Find the object’s x,y location coordinates to draw on the screen
Add a Wiper Functionality to wipe off the Whole screen
Add an Eraser Functionality to erase parts of the drawing
Before moving on I strongly recommend you to check Edge detection, Countor Detection, BackgroundSubtractor and look how to find them in OpenCV and all the Parameteres they accept
And do check about RBG, HSV
And yeah please select pen somthing like this:
So that when ever you want to write next alphabet you just have to switch the position of pen and program will no longer detect the pen and you can write next alphabet where-ever you want in the screen.
There is no complusion that you have to select the pen similar to above images, main point just select the pen which has two different color for forntface and backface
Please find the code for virtual pen in virtualPen.ipynb
Feel free to set your own range during mask, and to set the upper and lower range for cv2.inRange() you can run this file.
Open userSites.js, then add a code like the syntax bellow:
newSite("Website Name","full url with http or https","iconname.ext","Description (you can leave it empty)");
For example, if you want to add Blogger:
newSite("Blogger","https://blogger.com","b.png");
DO NOT FORGET TO ADD THE IMAGE IN THIS DIRECTORY: img/site.
To add an external icon, just add true at the end:
For example:
newSite("Website Name","full url with http or https","http://www.example.com/iconname.ext","Description (you can leave it empty)",true);
Just replace http://www.example.com/iconname.ext with the actual image url.
Add Versions
First: Create your userSites script file, and the name should be like this: version_userSites.js.
For example, if you want to name your version personal, so the script file name should be: personal_userSites.js.
Second: Add the websites you want in that newly created file, just like in userSites.js.
Finally: To access the homepage with your created version, you should add ?version=version in the URL bar.
For the above example, you should add ?version=personal in the URL bar, and it’ll load your websites you added in personal_userSites.js file. In other words, if your version is personal and the current homepage link is https://example.com, you can access it like this: https://example.com?version=personal.
An instruction set simulator for the RISC-V architecture written in Java.
Written as the last assignment for the course “02155: Computer Architecture and Engineering” at the Technical University of Denmark
Prints null-terminated string whose address is in x11
10
exit
Stops execution
11
print_char
Prints character in x11
Compiling and running
Install packages
If you haven’t run a JavaFX application on Ubuntu before run the following command:
sudo apt-get install openjfx
Java Development Kit 8
Compile
Assuming no other Java files present:
cd path/to/package/files
javac *.java
Run
Assuming current work directory contains RISCVSimulator package directory:
cd path/to/package/
java RISCVSimulator.Main
OpenJDK 11
As OpenJDK no longer supplies a runtime environment or JavaFX, it is required to have OpenJFX downloaded.
The path to OpenJFX will be referred to as %PATH_TO_FX%.
Compile
cd path/to/package/files
javac --module-path %PATH_TO_FX% --add-modules javafx.fxml,javafx.base,javafx.controls,javafx.graphics *.java
Run
Requires a Java 11 Runtime Environment. This is easily obtained on Ubuntu through apt, but Windows users will need to use jlink to build their own. See Releases for example.
Assuming current work directory contains RISCVSimulator package directory:
cd path/to/package
java --module-path %PATH_TO_FX% --add-modules javafx.fxml,javafx.base,javafx.controls,javafx.graphics RISCVSimulator.Main
Unfortunately, the program was not written with modular Java support in mind. For this reason, there is no better way of running the program, as it’s not possible to use jlink in order to build the application with all dependencies bundled. Writing batch files or shell scripts is adviced.
Enhancing Text Retrieval with Metadata Filters using MongoDB and LangChain Agent
Retrieving relevant documents based on text similarity can be challenging, especially when users seek information based on specific criteria like dates or categories. Traditional similarity algorithms might not always yield accurate results under these conditions. In this tutorial we will outlines a method to prefilter data using metadata extraction with MongoDB vector search and LangChain Agent, ensuring more precise retrieval of documents.
Getting Started
Before diving into the tutorial, ensure you have the following prerequisites:
This tutorial utilizes the News Category Dataset from HuffPost, covering news headlines from 2012 to 2022. Each record includes attributes like category, headline, authors, link, short_description, and date.
Setting Up
1. Establishing OpenAI Connections
First, create a OpenAI connection for embedding and completion.
In this article I am going to use Azure OpenAI Models, but OpenAI Models should work also.
from langchain_core.tools import BaseTool, tool
from openai import BaseModel
from pymongo import MongoClient
import os
from typing import Dict, List, Optional, Tuple, Type
from langchain.pydantic_v1 import BaseModel, Field
from langchain_core.prompts import ChatPromptTemplate, MessagesPlaceholder
from langchain_core.messages import AIMessage, HumanMessage
from langchain_core.utils.function_calling import convert_to_openai_function
from langchain_community.vectorstores import Neo4jVector, MongoDBAtlasVectorSearch

embeddings = AzureOpenAIEmbeddings(
    azure_deployment="embedding2",
    openai_api_version="2023-05-15",
)
llm = AzureChatOpenAI(
    azure_deployment=<deployment-Name>,
    openai_api_version="2023-05-15",
)

client: MongoClient = MongoClient(CONNECTION_STRING)

llm.invoke("hello")
2. Index Creation
Next, create an Atlas Vector Search index to efficient data retrieval based on vector similarity and metadata filters.
A string fields (category, authors, date) for pre-filtering the data.
The vector embeddings field (embedding) for performing vector search against pre-filtered data.
Load the data
We can now embed and store into MongoDB by reading the data in JSON format and load it using [DataFrameLoader](Pandas DataFrame | 🦜️🔗 LangChain) from LangChain, so that we can search over them at runtime.
There is no need in our case to split documents in our case. After that, you can check the collection, and we should see the data in the collection, I am using MongoDB Compass | MongoDB for that.
3. Querying the Index
We will start by reading the index that we already created so we can use to query our data.
We take a text search query, embed it, and perform some sort of “similarity” search to identify the stored splits with the most similar embeddings to our query embedding. The simplest similarity measure is cosine similarity — we measure the cosine of the angle between each pair of embeddings (which are high dimensional vectors).
vector_index=read_index()
vector_index.similarity_search_with_score(k=4,query="give articles talks about Covid")
4.Creating the Data Extraction Tool
Tools are functions that an agent can invoke. The Tool abstraction consists of two components:
The input schema for the tool. This tells the LLM what parameters are needed to call the tool. Without this, it will not know what the correct inputs are. These parameters should be sensibly named and described.
The function to run. Include the input Schema as prefilter fields before retrieving the data from the the MongoDB collection.
First, will start by creating a class for arguments schema for our extraction tool, and providing some examples so that the LLM would understand it better, you can observe that we give the LLM information about the format and examples as well as provide an enumeration.
class NewsInput(BaseModel):
    category: Optional[str] = Field(
        description="Any particular category that the user wants to finds information for. Here are some examples: "
        +  """{Input:show me articles about food ? category: food} , {Input: is there any articles tagged U.S. News talking about about Covid ? category: U.S. News"""
    )
    authors: Optional[str] = Field(
        description="the Author  Name that wrote articles the user wants to find articles for "
        +"""{Input:give article written by Marry lother? Auther: Marry lother}, {input: is Nina Golgowski have any articles? Author:Nina Golgowski """
    )
    date: Optional[str] = Field(
        description="the  date of an article that the use want to use to filter article, rewrite it format yyyy-MM-ddTHH:mm:ss"
    )
    determination: Optional[str] = Field(
        description="the condition for the date that the user want to filter on ", enum=["before", "after","equal"]
    )
    desc: Optional[str] = Field(
        description="the details and description in the article the user is looking  in the article or contained in the article"
    )
By understanding how the users will use the model, it will help writing a better schema description for the Extraction schema:
For example, if the user entered the following prompt:
{"input": "give me articles written by Elyse Wanshel after 22nd of Sep about Comedy"}
The Extraction function will return the argument for the tool as following:
We need now to create Agent, Agent use OpenAI model to decide if it need to call the tool. They require an executor, which is the runtime for the agent. The executor is what actually calls the agent, executes the tools it chooses, passes the action outputs back to the agent, and repeats. The agent is responsible for parsing output from the previous results and choosing the next steps.
we first create the prompt we want to use to guide the agent.
prompt = ChatPromptTemplate.from_messages(
    [
        (
            "system",
            "You are a helpful assistant that finds information about articles "
            "make sure to ask the user for clarification. Make sure to include any "            "available options that need to be clarified in the follow up questions "            "Do only the things the user specifically requested. ",
        ),
        MessagesPlaceholder(variable_name="chat_history"),
        ("user", "{input}"),
        MessagesPlaceholder(variable_name="agent_scratchpad"),
    ]
)
We can initialize the agent with the OpenAI, the prompt, and the tools. The agent is responsible for taking in input and deciding what actions to take. Crucially, the Agent does not execute those actions that is done by the AgentExecutor.
Finally, we combine the agent with the tools inside the AgentExecutor (which will repeatedly call the agent and execute tools).
agent_executor=AgentExecutor(agent=agent, tools=tools)
question={"input": "give me articles written by Elyse Wanshel after 22nd of Sep about Comedy","chat_history":[],"agent_scratchpad":""}
result=agent_executor.invoke(question)
print("Answer", result['output'])
For the example we used:
{"input": "give me articles written by Elyse Wanshel after 22nd of Sep about Comedy"}
Answer:
I found an article written by Elyse Wanshel after September 22nd about Comedy:
Title: 23 Of The Funniest Tweets About Cats And Dogs This Week (Sept. 17-23)
Category: COMEDY
Short Description: “Until you have a dog you don’t understand what could be eaten.”
In this blog post, we’ve implemented example for using metadata filters using MongoDB, enhancing vector search accuracy and has minimal overhead compared to an unfiltered vector search.
There are other databases provide prefilter option for vector search like Neo4j, Weaviate and others.
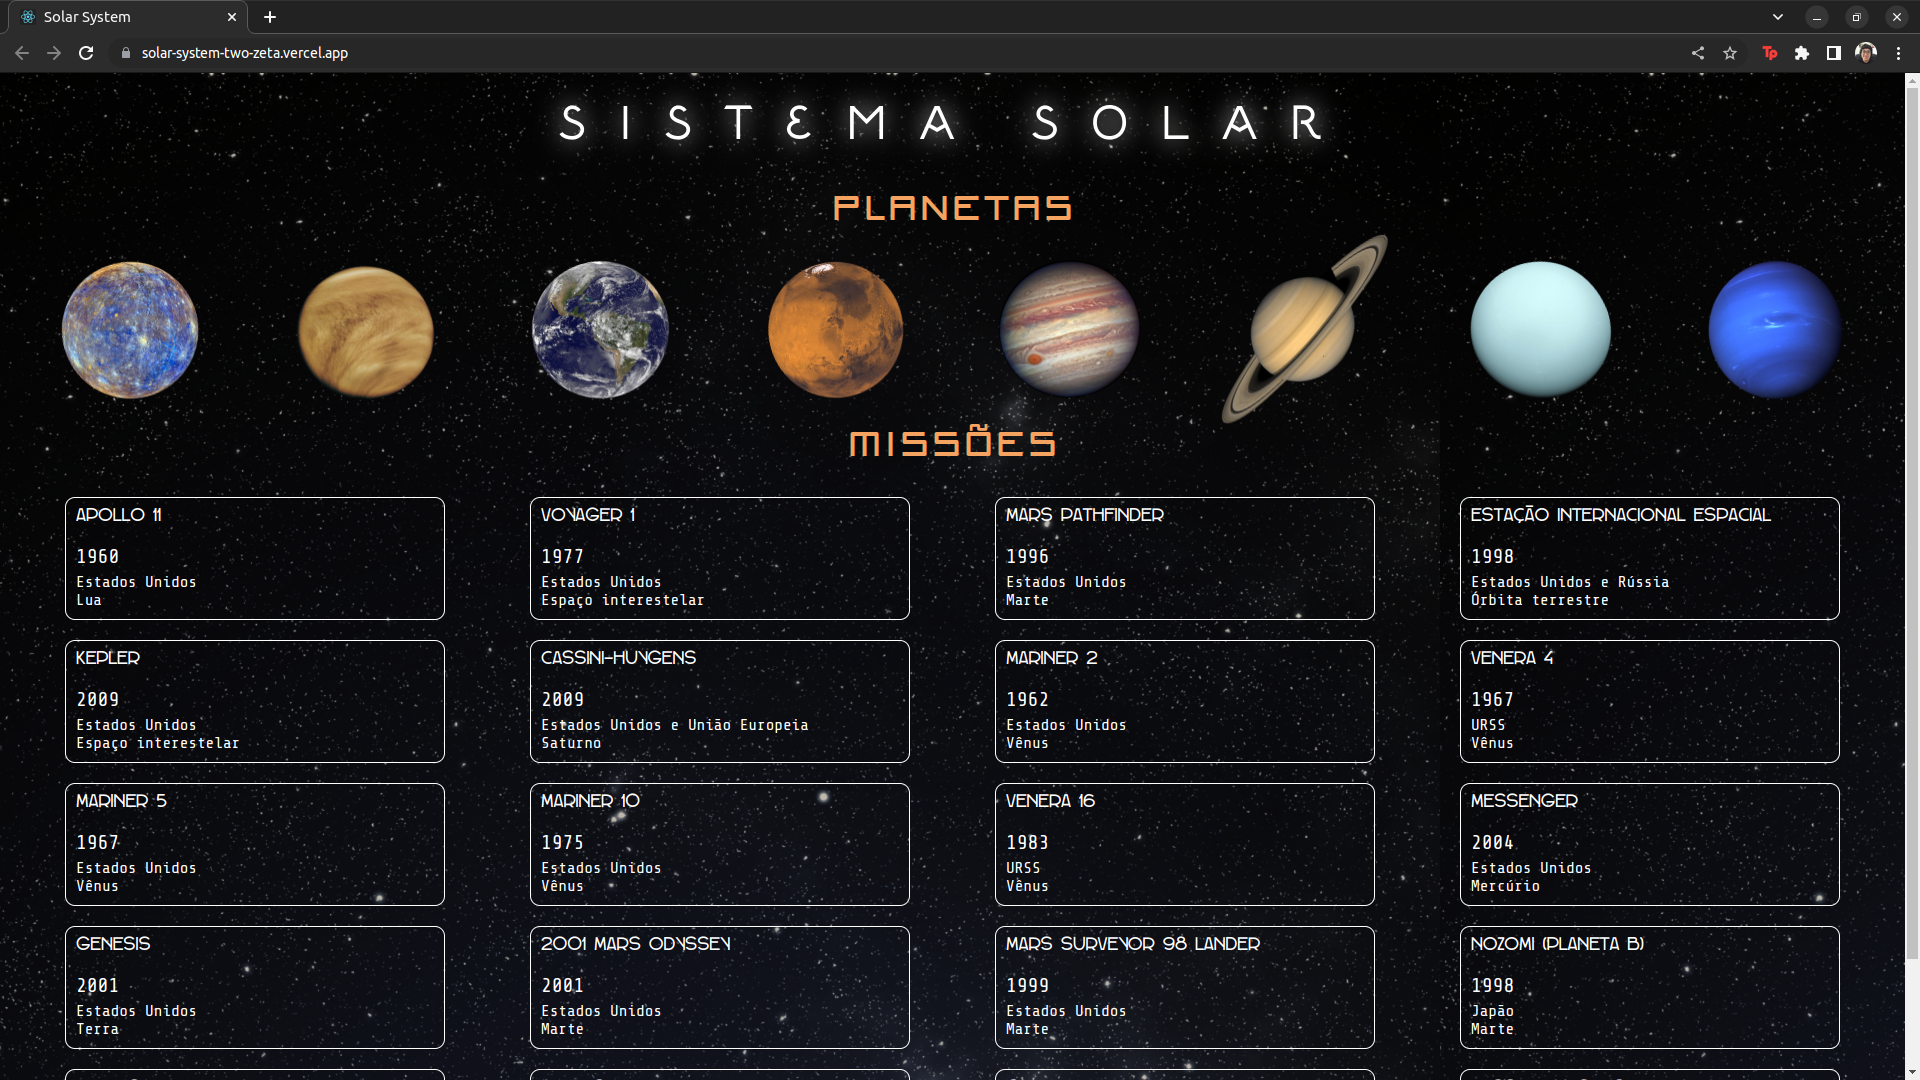
This project was developed in April 2022, as part of the Front-end module at Trybe.
The objective of Solar System was to create a landing page containing all planets and known missions to these planets, using React class components.
Technologies and Tools
Solar System was developed using React and CSS.
In it, I could develop my skills of:
JSX, a Javascript syntax extension;
The render() method;
Imports and exports from different files;
Utilization of props;
Validate props using the PropTypes library;
Create components from an array using HOFs.
Installation
Create a directory using the mkdir command:
mkdir saraivais-projects
Access the directory using the cd command and clone the repository:
  cd saraivais-projects
  git clone git@github.com:saraivais/solar-system.git
Access the project directory and install it’s dependencies:
  cd solar-system
  npm i
Lastly, use the npm start command and access the project via browser, using the following url
Este projeto foi desenvolvido em Abril de 2022, como parte do módulo Front-end da Trybe.
O objetivo do Solar System era criar uma landing page contendo todos os planetas e missões conhecidas a estes planetas, usando componentes de classe React.
Tecnologias e Ferramentas
O Solar System foi desenvolvido usando React e CSS.
Nele, pude desenvolver minhas habilidades de:
JSX, uma extensão de sintaxe Javascript;
O método render();
Importações e exportações de diferentes arquivos;
Utilização de props;
Validar props usando a biblioteca PropTypes;
Criar componentes a partir de um array usando HOFs.
Instalação
Crie um diretório usando o comando mkdir:
mkdir saraivais-projetos
Acesse o diretório usando o comando cd e clone o repositório:
  cd saraivais-projetos
  git clone git@github.com:saraivais/solar-system.git
Acesse o diretório do projeto e instale suas dependências:
  cd solar-system
  npm i
Por fim, use o comando npm start e acesse o projeto via navegador, usando a seguinte url


 https://github.com/patriciafiona/Dicoding_JetpackPro_03