This repository hosts the code for a working RESTful API that utilizes Koa.js to expose noblox.js functions on the internet. Essentially, with this project, you can host it on your own server and interact with the Roblox API through your own Roblox game.
To have your code running on a 24/7 basis, you need to use a VPS. We recommend using DigitalOcean for its ease of use and. This referral link provides you with a $100 credit which can be used over 60 days. Other options include Amazon Web Services, Microsoft Azure, and Google Compute Engine.
Configuration
server.js
After installing this repository on your server, start by creating an .env file to house your configuration settings. You can duplicate the .env.sample file and fill in the missing details.
Unless you know what you are doing, leave the PORT number the same.
MAX_RANK refers to the highest rank (1-254) the logged in account is allowed to promote users to.
API_TOKEN refers to a secret key to secure your RESTful API to avoid your API being accessed by unauthorized users. It is best to generate a key that isn’t easy to guess. You can use this website to use an automatically generated key. You need not memorize this key.
COOKIE refers to the cookie of the logged-in user account the API will execute functions from. To find your cookie, please read this.
After your file is configured, use a process manager like pm2 to have your script run 24/7. We do not provide support for VPS, network, and domain configuration.
noblox.lua
If you plan on using the provided Lua module (ModuleScript) in this project, please do the following:
Place the script only in ServerScriptService.
Update the DOMAIN value in CONFIGURATION to reflect your server’s IP address/domain & port. (e.g. if your domain name is noblox.io and this is running on port 3000, your value here would be https://noblox.io:3000)
Update the API_TOKEN value in CONFIGURATION so that it matches what you put earlier in server.js.
Optional: provide a DEFAULT_GROUP_ID to default to having noblox.js functions run on a single group when not specified.
Sample Android Library Publishing to GitHub Package Registry
This Android project showcases the steps to publish and consume Android Libraries on the GitHub Package Registry.
It is made up of 2 modules
sampleAndroidLib
Android library module with basic functionality
Publishes the generated library file onto the GitHub Package Registry
The build.gradle file inside this module has the code (plugin, tasks and authentication) related to publishing the library
app
Sample Android application module with the build.gradle file that shows the code for consuming an Android library from GitHub Package Registry.
Publish Android library to GitHub Package Registry
Step 1 : Generate a Personal Access Token for GitHub
Inside you GitHub account:
Settings -> Developer Settings -> Personal Access Tokens -> Generate new token
Make sure you select the following scopes (” write:packages”, ” read:packages”) and Generate a token
After Generating make sure to copy your new personal access token. You won’t be able to see it again!
Step 2: Store your GitHub – Personal Access Token details
Create a github.properties file within your root Android project
In case of a public repository make sure you add this file to .gitignore for keep the token private
Add properties gpr.usr=GITHUB_USERID and gpr.key=PERSONAL_ACCESS_TOKEN
Replace GITHUB_USERID with personal / organisation Github User ID and PERSONAL_ACCESS_TOKEN with the token generated in #Step 1
Alternatively you can also add the GPR_USER and GPR_API_KEY values to your environment variables on you local machine or build server to avoid creating a github properties file
Step 3 : Update build.gradle inside the library module
Add the following code to build.gradle inside the library module
def getVersionName = { ->return"1.0.2"// Replace with version Name
}
def getArtificatId = { ->return"sampleAndroidLib"// Replace with library name ID
}
publishing {
publications {
bar(MavenPublication) {
groupId 'com.enefce.libraries'// Replace with group ID
artifactId getArtificatId()
version getVersionName()
artifact("$buildDir/outputs/aar/${getArtificatId()}-release.aar")
}
}
repositories {
maven {
name ="GitHubPackages"/** Configure path of your package repository on Github * Replace GITHUB_USERID with your/organisation Github userID and REPOSITORY with the repository name on GitHub*/
url = uri("https://maven.pkg.github.com/GITHUB_USERID/REPOSITORY")
credentials {
/**Create github.properties in root project folder file with gpr.usr=GITHUB_USER_ID & gpr.key=PERSONAL_ACCESS_TOKEN**/
username = githubProperties['gpr.usr'] ?:System.getenv("GPR_USER")
password = githubProperties['gpr.key'] ?:System.getenv("GPR_API_KEY")
}
}
}
}
Make sure to build and run the tasks to generate the library files inside build/outputs/aar/ before proceeding to publish the library.
Execute the Publish gradle task which is inside your library module
$ gradle publish
Once the task is successful you should be able to see the Package under the Packages tab of the GitHub Account
In case of a failure run the task with –stacktrace, –info or –debug to check the logs for detailed information about the causes.
Using a library from the GitHub Package Registry
Currently the GitHub Package Registry requires us to Authenticate to download an Android Library (Public or Private) hosted on the GitHub Package Registry. This might change for future releases
Steps 1 and 2 can be skipped if already followed while publishing a library
Step 1 : Generate a Personal Access Token for GitHub
Inside you GitHub account:
Settings -> Developer Settings -> Personal Access Tokens -> Generate new token
Make sure you select the following scopes (“read:packages”) and Generate a token
After Generating make sure to copy your new personal access token. You won’t be able to see it again!
Step 2: Store your GitHub – Personal Access Token details
Create a github.properties file within your root Android project
In case of a public repository make sure you add this file to .gitignore for keep the token private
Add properties gpr.usr=GITHUB_USERID and gpr.key=PERSONAL_ACCESS_TOKEN
Replace GITHUB_USERID with personal / organisation Github User ID and PERSONAL_ACCESS_TOKEN with the token generated in #Step 1
Alternatively you can also add the GPR_USER and GPR_API_KEY values to your environment variables on you local machine or build server to avoid creating a github properties file
Step 3 : Update build.gradle inside the application module
Add the following code to build.gradle inside the application module that will be using the library published on GitHub Packages Repository
repositories {
maven {
name ="GitHubPackages"/* Configure path to the library hosted on GitHub Package Registry * Replace UserID with package owner userID and REPOSITORY with the repository name * e.g. "https://maven.pkg.github.com/enefce/AndroidLibraryForGitHubPackagesDemo"*/
url = uri("https://maven.pkg.github.com/UserID/REPOSITORY")
credentials {
username = githubProperties['gpr.usr'] ?:System.getenv("GPR_USER")
password = githubProperties['gpr.key'] ?:System.getenv("GPR_API_KEY")
}
}
}
inside dependencies of the build.gradle of app module, use the following code
The directory of the theme should be present in $HOME/.local/share/themes/ (anything in /usr is blacklisted). So you either have to copy from /usr/share/themes to $HOME/.local/share/themesOR if you installed it in $HOME/.themes, symlinking it to $HOME/.local/share/themes also works.
This package allows to easily setup localization with a Laravel application using Vue. It is based on Lang.js.
Note: feature requests are no longer accepted. I’ll still merge easily-reviewable PRs. I don’t use this package anymore and I advice using vuei18n instead.
Installation
$ yarn add laravel-vue-lang
With the Laravel Mix extension
This package ships with a Laravel Mix extension. You can include it and call .lang() on Mix. If for some reason your localization files are not in resources/lang, you can pass its path as a parameter.
If you prefer manual configuration, you will need to add a rule to load your translations, and a @lang alias that point to your lang directory. Your Mix configuration should look like this:
It is possible to have a root-level set of translations, such as a /resources/lang/fr.php instead of /resources/lang/fr/domain.php. You can use these translations by not specifying any domain while using the translate function.
<!-- Component.vue -->
<template><div><span>{{ __('Hey you') }}</span><!-- Salut toi --></div></template>
This is possible by working around lang.js and using a defined “global” domain. The actual translation key would be __global__.Hey you, but __global__ will be stripped so the fallback can be used if the translation is not found.
Options
locale and fallback
You can force a locale and define a fallback by using these two options. By default, the locale is determined using the HTML lang attribute. If it is empty, navigator.language is used instead.
If you use a translation key that can’t be found, the fallback language will be used instead. If it still can’t be found, the translation key will be returned.
ignore
You can ignore a localization file in a specific language by adding it to the ignore options.
ignore: {fr: ['validation'],}
globalTranslationsKey
This is the key used to work around lang.js in order to implement root-level translations. The default is __global__, and you shouldn’t need to change it.
Automatic Grades for Student Essays: End-to-End Machine Learning Project
Welcome to our repository! This project demonstrates an end-to-end solution for automatically grading student essays using advanced machine learning techniques, from initial data analysis to deployment. Our application accepts an essay image and outputs the text and its corresponding grade, leveraging a fine-tuned transformer model available on the Hugging Face platform.
Project Structure
The repository is organized into several key areas:
app/: Contains the user interface for essay submission and grading display.
data/: Datasets used in model training and evaluation.
endpoints/: FastAPI implementation for deploying machine learning models as endpoints.
ml/: Core machine learning code including exploratory data analysis, data preprocessing, and training scripts.
Detailed Contents
ML Folder: Focuses on machine learning model development.
preprocessing/: Data preprocessing techniques, including exploratory data analysis and sampling methods.
training/: Model training scripts, exploring different machine learning algorithms and transformer models.
error_analysis/: Banchmark and error analysis of the most relevant model.
Endpoints: Contains FastAPI code for model deployment, allowing real-time essay grading.
App: A user-friendly interface for submitting essays and receiving grades.
Getting Started
To get started with this project, clone the repository and install the required dependencies:
git clone https://github.com/mlengineershub/LazyTeacher
cd LazyTeacher
pip install -r requirements.txt
Refer to individual READMEs in each directory for more detailed instructions on running each component.
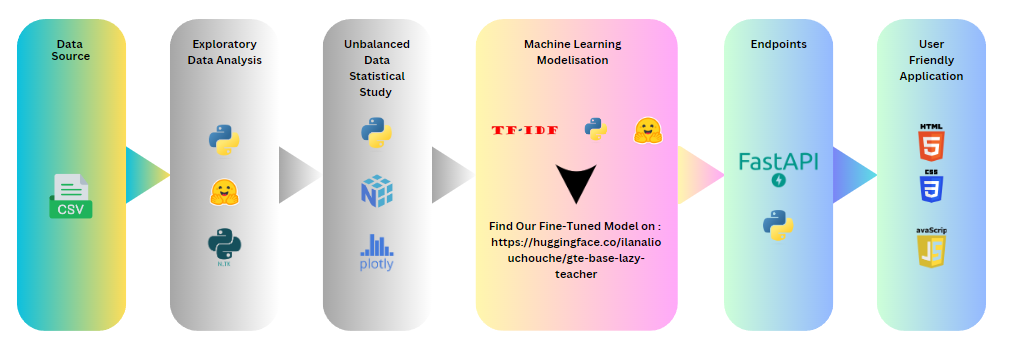
Global Architecture
This diagram illustrates the comprehensive workflow of our project, from data handling and model training to deployment and user interaction.
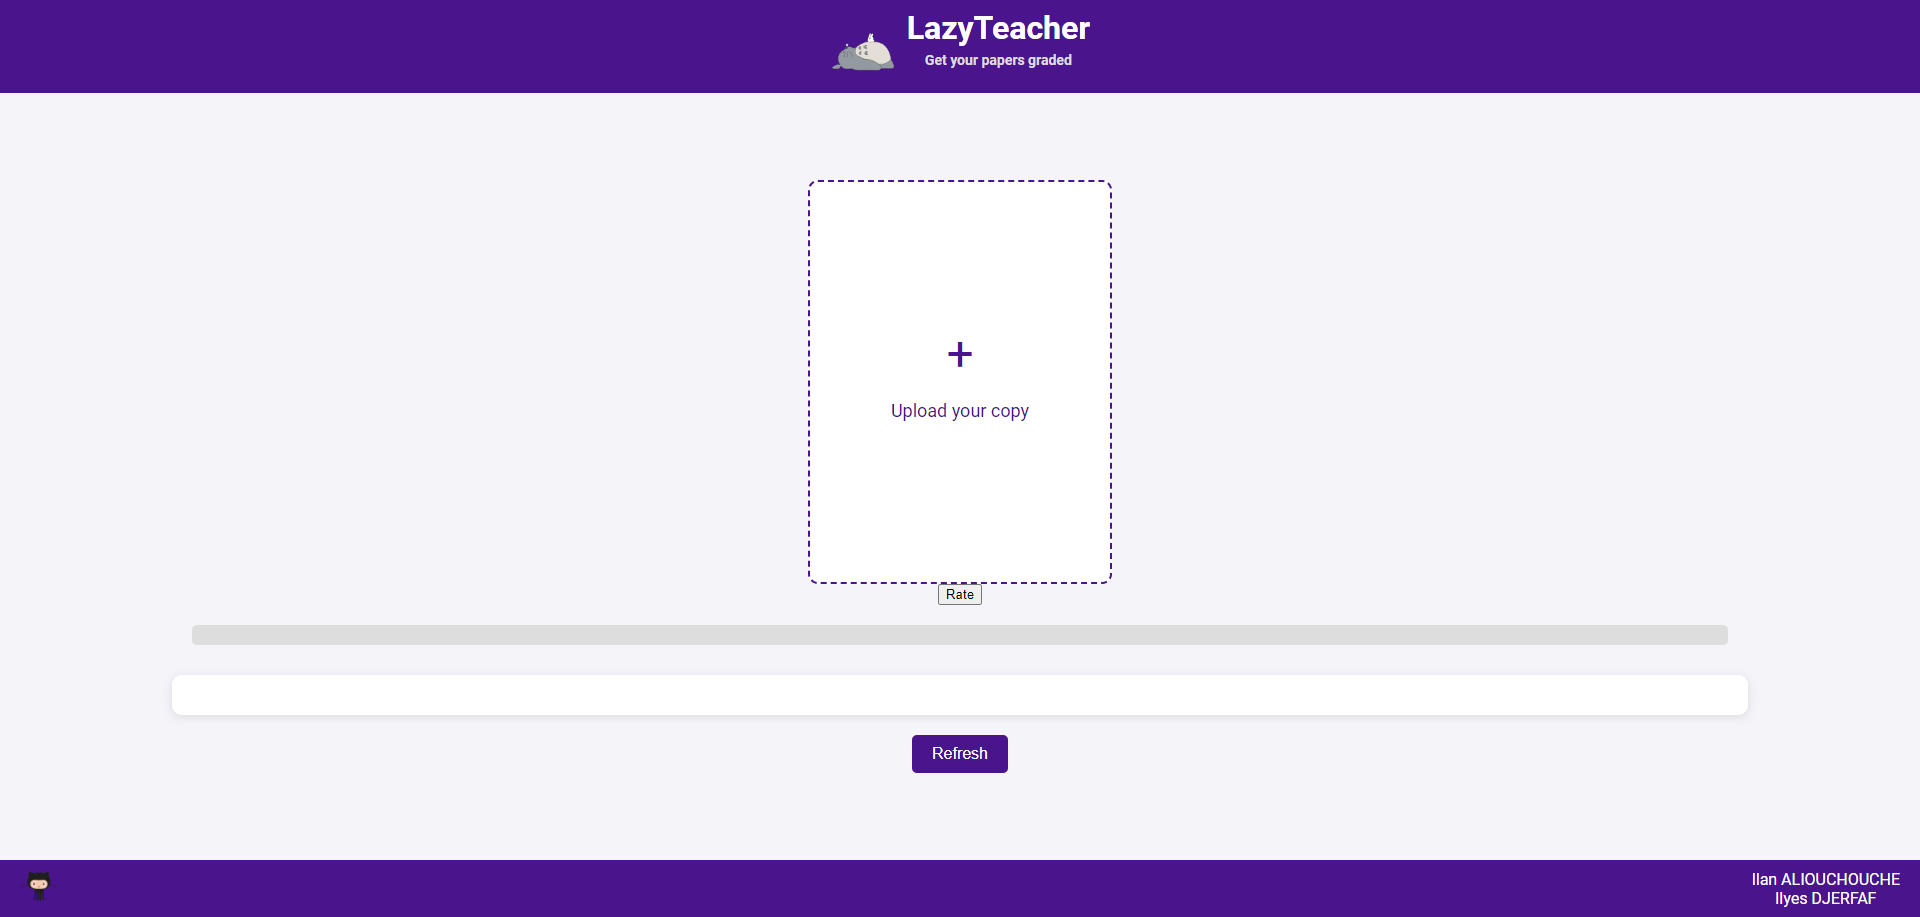
Here is a look of our front end application :
How to Use
Navigate through the project using the following links to understand and interact with the different components:
CONCEPT (COsmological N-body CodE in PyThon) is a
free and open-source simulation code for cosmological structure formation. The
code should run on any Linux system, from massively parallel computer clusters
to laptops. The code is written almost exclusively in Python, but achieves
C-like performance through code transformation using a custom
transpiler/optimizer and Cython. While highly competitive regarding both
performance and accuracy, CONCEPT further strives for ease of use.
CONCEPT is capable of simulating matter particles evolving under
self-gravity in an expanding background. It has multiple gravitational solvers
to choose from, and has adaptive time integration built in. In addition to
particles, the code is further able to evolve fluids at various levels of
non-linearity, providing the means for the inclusion of more exotic species
such as massive neutrinos, as well as for simulations consistent with general
relativistic perturbation theory. Various non-standard species — such as
decaying cold dark matter — are fully supported.
CONCEPT comes with a sophisticated initial condition generator built in, and
can output snapshots, power spectra, bispectra and several kinds of renders.
The CLASS code is fully integrated into CONCEPT, supplying the needed
information for e.g. initial condition generation and
general relativistic corrections.
which installs CONCEPT along with all of its dependencies into a single
directory. The installation takes a couple of hours on modern hardware.
Should the installation process end prematurely, simply rerun the installation
command and it will pick up from where it was.
To run a small sample simulation, navigate to the directory where CONCEPT
is installed and invoke
./concept -p param/example_basic -n 2 --local
This will run the simulation defined by the provided example_basic
parameter file using 2 processes.
This encryption program was built based on the requirements of the Enigma project from Turing School of Software and Design.
It was submitted by Mark Ertmer (2111 BE) in January 2022 as the Final Project for Mod 1.
This application uses an algorithm to encrypt and decrypt a text-based message with the use of a 5-digit, randomly-generated key and the 6-digit numeric date of encryption in DDMMYY format. The application is run from the command line, where the user can designate an input file to encrypt/decrypt and an output file to write the resulting encryption/decryption.
Getting Started
Fork and Clone this repo to your machine.
In your terminal, navigate to the home directory, titled enigma.
Encrypting Messages
The command to encrypt a text file follows this structure:
ruby encrypt.rb <source file> <output file>
…where the <source file> is the filepath to the text you wish to encrypt. The program then writes the encrypted text to the <output file> specified.
EXAMPLE:
You will see there is a test_message.txt in the file directory. It contains the text:
The test_encryption.txt output is created in the file directory with encrypted text that might look something like this:
inmiuu,hqqo xryhyizmpb!fpydkhyiybmnxhajd.hbwj
A confirmation message prints to the terminal, giving the output filepath, along with the key and date. These two pieces of information will be needed to decrypt the message later.
Created ./file/test_encryption.txt with the key 32547 and date 170122
Decrypting Messages
The command to encrypt a text file follows this structure:
You’ll need to include the source and output files, along with the six-digit date believed to be used for encryption.
test_crack.txt is created in file, and contains the decoded text:
hello, this is a test! have a super day. end
A confirmation prints to the terminal, giving the output filepath, along with the date used and cracked key.
Created ./file/test_crack.txt with the cracked key 32547 and date 170122
Encryption Algorithm
The algorithm makes use of a 27-character set which includes all the lowercase letters in the English alphabet plus a space. The program stores this information as an array to allow easy access to each character and its index:
@characters = ("a".."z").to_a << " "
The algorithm shifts each character n number of places through the array. For example, an “a” shifted 3 places becomes a “d”. It rolls back from the end of the array, so “z” with a shift of 2 becomes “a” (remember the set ends with a space).
As the program moves through the message string, different shifts are applied. There is an A shift, a B shift, a C shift, and a D shift, which are rotated sequentially (the first character uses the A shift, the second is B, etc.).
The A shift key comes from the first two numbers in the key. (__57__034 -> 57)
The B shift key comes from the second and third numbers in the key. (5__70__34 -> 70)
The C shift key comes from the third and fourth numbers in the key. (57__03__4 -> 03)
The D shift key comes from the fourth and fifth numbers in the key. (578__34__ -> 34)
In addition, an offset is applied to each shift key that comes from the six digit date:
Square the date: 170122 * 170122 = 28941494884
Retain the last four digits: 4884
The first digit is the A offset: 4
The second digit is the B offset: 8
The third digit is the C offset: 8
The fourth digit is the D offset: 4
The total shift is the sum of the shift key and offset for each letter:
A shift = 57 + 4 = 61
B shift = 70 + 8 = 78
C shift = 03 + 8 = 11
D shift = 34 + 4 = 38
Note: Uppercase letters are automatically downcased before encryption, so any decrypted message will not include capitalization.
Note: If the message text includes any symbols that are not included in the character set, such as numbers or punctuation, those symbols are essentially ignored and passed to the output encryption (or decryption, as the case may be) unchanged.
Input Handling
To avoid crashing, the program includes contingencies for the following improper input scenarios when running encrypt.rb, decrypt.rb, and crack.rb:
invalid or missing source file and path
invalid filepath or missing directory for output file
wrong number of arguments
invalid key syntax
invalid date syntax
If any of these conditions apply, the program ends after outputting a message to help the user enter a valid command:
INVALID INPUT
- Make sure your source file is valid.
- Make sure to use a valid filepath for your output.
- The key must be exactly 5 digits, numbers only.
- Enter a date using 'DDMMYY' formatting. 6 digits, numbers only.
COMMAND STRUCTURE:
$ ruby decrypt.rb <source filepath> <output filepath> <key> <date>
Exploration
Finding Equivalent Keys
While testing my crack methods, there were several isolated times when a reliable method failed. The reason was that the key found did not match the key used for the original encryption, although it was able to accurately decrypt the message.
I realized that it is possible for more than one key to result in the same effective A, B, C, and D shifts, because numbers larger than 27 loop back around. So in other words, a shift of 30 is equivalent to a shift of 3 (because 30 = 27 + 3), or a shift of 71 is equivalent to a shift of 17 (because 71 = 27 + 27 + 17).
I was curious to see how many such sets of equivalent keys existed in all the possible keys, so I wrote a short script to find out:
There are 14,760 pairs of keys that can decrypt the same message.
There are 1,022 sets of three keys that can decrypt the same message.
There is one set of four keys that can decrypt the same message. They are:
09090
90909
36363
63636
(Each of these keys results in an A, B, C, and D shift of 9)
IMPLICATIONS FOR PROBABILITY
On its face, the chance of guessing a correct 5-digit key appears to be one in 100,000 (all the numbers from 00000 to 99999). However, the chances are somewhat better than that:
There are 14,760 cases where guessing a key would result in being equivalent to one other: subtract 14,760
There are 1,022 cases where guessing a key would result in being equivalent to two other keys: subtract 2,044 (1,022 * 2)
There is 1 case where guessing a key would result in being equivalent to three other keys: subtract 3
100,000 – 14,760 – 2,044 – 3 = 83,193
Accounting for this, the chance of guessing a correct key for a given encryption becomes one in 83,193.


 https://github.com/noblox/noblox.js-server